If you followed my previous post, at this point you should have a working RetroPie setup. However, it can still get better. Here, I will answer many small questions I've had to find the answers for, so that you can conveniently find them all in one place and save some time. I'll present the questions/answers in the same order I solved them:
- How do you remove the black border around the screen?
- How do you use speakers with the Raspberry Pi?
- How
do you display the Sega Genesis logo instead of the Sega Megadrive logo
in the main menu? TurboGrafx-16 instead of PC-Engine? Etc.
- How do you put pictures and info for each games you downloaded?
- How do you get CD games to work (i.e. Sega CD, PC-Engine CD, PlayStation, etc.)
- How do you get MAME games to work?
- How do you play multiplayer games?
- How do you configure the controller input only for a certain console?
How do you remove the black border around the screen?
This might not happen to you, but from what I've seen online, this is a pretty common thing to fix. To fix this, in the RetroPie options menu, select "Raspi-Config" (alternatively, you can access this by exiting RetroPie and type "sudo raspi-config" in the terminal).
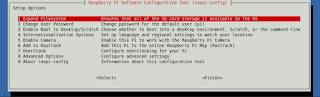
Simply go to Advanced options (using the keyboard), and disable the overscan setting.
If you are using a CRT TV to display your games, setting things right can get a little more tricky to make sure the image is not cut off on the sides. I'll give you hints at how to do it, but if that's not enough, just contact me ;)
- Download the set_overscan script from here: https://github.com/ukscone/set_overscan
- Do 'sudo nano /boot/config.txt' in your terminal after quitting EmulationStation (by pressing F4) and make sure that there is no '#' symbol before the line that has "overscan_scale" and that there IS a '#' symbol before the line that says "disable_overscan".
- Get into the set_overscan folder you downloaded and do 'sudo ./set_overscan.sh'. Follow the instructions shown on screen.
- Reboot your system by doing 'sudo reboot', you should be all set after this.
How do you use speakers with the Raspberry Pi?
It is possible that the display you use for your Raspberry Pi has no speakers (e.g. a computer monitor instead of a TV). Therefore, to get sound, you will need to provide speakers. These can be plugged in the 3.5mm plug (next to the HDMI plug) of the Raspberry Pi. You will have to tell your Pi to output sound from this plug (instead of the HDMI) by going to the Audio section in the RetroPie options menu.
Note: In RetroPie, you have the option to control the volume output (I forgot where to access it, but I'll edit this post when I remember), but I recommend you don't use this option to lower the volume. What I noticed is the Raspberry Pi is not good at outputting low sound: you will start hearing scratching and other noises if you use headphones, for example. If you want to lower the sound, leave the volume at 100% inside RetroPie, and simply adjust the volume on your speakers or headphones (if possible). You can always check out this gadget to control your output volume.
How do you display the Sega Genesis logo instead of the Sega Megadrive logo in the main menu? TurboGrafx-16 instead of PC-Engine? Etc.
Note: This answer is outdated, there is a better way to do this now, which I have not documented yet. See the bottom of this page: https://github.com/RetroPie/RetroPie-Setup/wiki/Mega-Drive-Genesis. The problem with the method shown below is that every time you update your RetroPie, the settings will be reverted to their default values.
Some consoles have different names and logos in different regions of the world. You can change the logo you see for some consoles in RetroPie's menu by doing cd /etc/emulationstation/es_systems.cfg and sudo nano es_systems.cfg and change
  <system>
    <name>megadrive</name>
    <fullname>Sega Mega Drive / Genesis</fullname>
    <path>~/RetroPie/roms/megadrive</path>
    <extension>.smd .bin .gen .md .sg .zip .SMD .BIN .GEN .MD .SG .ZIP</extension>
    <command>/opt/retropie/supplementary/runcommand/runcommand.sh 0 _SYS_ megadrive %ROM%</command>
    <platform>megadrive</platform>
    <theme>megadrive</theme>
  </system>
to
<system>
    <name>genesis</name>
    <fullname>Sega Genesis</fullname>
    <path>~/RetroPie/roms/megadrive</path>
    <extension>.smd .bin .gen .md .sg .zip .SMD .BIN .GEN .MD .SG .ZIP</extension>
    <command>/opt/retropie/supplementary/runcommand/runcommand.sh 0 _SYS_ megadrive %ROM%</command>
    <platform>genesis</platform>
    <theme>genesis</theme>
  </system>
To exit nano, do Ctrl-X and press Y.
For more info, search the RetroPie guide for the console you want to modify, and look for the "Advanced Configuration" section.
To access this tool in RetroPie, simply press Start (controller or keyboard), and select "Scraper". You will find this screen:
You can select from which database you want to scrape your game info (as of right now, TheGamesDB is the one that works best) and select if you want to scrape ratings or not (some of these ratings are pretty bogus, you might as well rate games on your own). When you're done, press Scrape Now.
On this screen, you can filter if you want to scrape games that are missing an image, or all games (I suggest you scrape only missing image, to save time). Select for which system you would like to scrape (initially, all systems for which you provided roms are selected).
The last box lets you decide on conflicts, and I think it deserves discussion. Basically, since some games can have similar names, the Scraper will need help deciding which game is the right one for your rom (this screen, if you selected "ON" to decide on conflict):
You see in this picture, on the third line from the top, the name file of your rom which was used by the Scraper to search the database. Lots of result come up, and it can get stuck (it's pretty dumb). Deciding on conflicts is therefore good to make sure the picture and information you will write about your rom are accurate.
However... This can be a time consuming process, simply because reading the database takes a long time (maybe it's my Internet connection, your mileage may vary). When I download 30 games at once, I set the option "user decides on conflict" to OFF. The Scraper will then do its best to provide accurate results, and I won't have to decide for every game if the results are right or not. This is good because it saves a lot of time (you can take a walk outside while the Scraper works), but can be bad because the Scraper is bound to make a few mistakes from time to time (about 3% of the time for me).
If you find a game for which the Scraper made a mistake, you can press Select on that game, do "edit this game's metadata" and scrape only this game to fix it. It's not a perfect solution, but it's the best I know so far.
How do you get CD games to work (i.e. Sega CD, PC-Engine CD, PlayStation, etc.)
CD based consoles need BIOS to operate. That's true even outside RetroPie. If you want to play Snatcher on the Sega CD, for example, you will to get the BIOS for the Sega CD before the rom of the game. These BIOS are available on the same websites you can find roms. Usually, the BIOS for a console will be compressed together and all you have to do is extract these files in your ~/RetroPie/BIOS/ folder.
Another thing worth noting is that CD based games need two files to work: a .cue and a .bin/iso file. The .bin or .iso file is always the biggest: it's the game program itself. The .cue file is always small: it mainly contains the timestamps at which the game should play its music and tells where to load the .bin/iso file. Sometimes, even if you have the right BIOS, it is possible that your game will not start. This is typically because the .bin/iso file's name does not match what's written inside the .cue file Here's an example:
I downloaded Nexzr for the PC-Engine CD. I have two files: Nexzr.cue and Nexzr.iso. I already put them in the folder ~/RetroPie/pcengine of my Raspberry Pi. I can open and read the contents of Nexzr.cue by doing cd ~/RetroPie/pcengine and nano Nexzr.cue. I see the following:
FILE "NEXZR.ISO" BINARY
TRACK 01 AUDIO
INDEX 01 00:00:00
TRACK 02 MODE1/2352
PREGAP 00:03:00
INDEX 01 00:38:41
TRACK 03 AUDIO
PREGAP 00:02:00
INDEX 01 01:11:54
......... (etc)
What I would have to fix in this case is the first line: the file name NEXZR.ISO does not perfectly match Nexzr.iso (Linux is very strict about capitalization), and this is what was causing the problem. By changing the first line in Nexzr.cue to this:
FILE "Nexzr.iso" BINARY
Then all my problems are gone.
Note: Some file names can contain tricky characters, like "[", "]", "_", "!", etc. I suggest you rename your files to remove those characters (with the Linux command mv), so that you maximize your chances of success
How do you get MAME games to work?
MAME games are tricky to get to work. This is because every MAME game is its own console, essentially. Therefore, even if your RetroPie setup is perfect, it is still possible that you will face a MAME game that will simply refuse to work. This is normal, and there are plenty of MAME databases online keeping track of which games are fully emulated or not. The list of emulated MAME games keeps on growing over the years, so don't lose hope!
A few things you can try before giving up:
- I suggest you put your MAME roms in ~/RetroPie/roms/arcade
- Make sure you have the right BIOS for the game you downloaded. The most classic example is Neo-Geo games, which all require the same BIOS to startup. Simply extract the Neo Geo bios in the ~/RetroPie/BIOS/ folder.
- Maybe you can try using another MAME emulator. Indeed, when you start a game, you probably noticed that if you press a button right away, this will take you to a configuration screen. In this screen, you can change the emulator you want to use for each rom. Who knows, it can't hurt to try.
How do you play multiplayer games?
RetroPie lets you connect multiple USB controllers at once. As long as you configure every controller to your liking, all you have to do is start the game, and every controller will be assigned to a different controller port in the emulated console. In the bottom-left corner of the screen, when you start the game, you should see the name of every connected controller flash for a brief moment, showing in which controller port of RetroPie it is connected.
It can happen that the player who planned on being Player 1 will end up being another player. I don't fully understand how RetroPie decides which controller goes to which player in the emulator. However, I found a useful tool called Joystick Selection which lets you make that decision manually. It's quite easy to use and well documented for what it is, check it out!
Things get more complicated if you only have one controller and want to use the keyboard as your second controller. It's definitely possible, but despite trying by following these guidelines, I have not been able to do it myself. Try it out and let me know in the comments if you succeeded!
How do you configure the controller input only for a certain console?
Note: I highly doubt this section will be relevant to you, it's more a way for me to remember steps I did to solve a specific problem I encountered.
This is a Sega Genesis controller. Since the Sega Genesis is my favorite game console of all time, I had to find a way to play games on the RetroPie with a controller that had a similar button layout. The USB controller I ended using is the Hori Fighting Commander 4
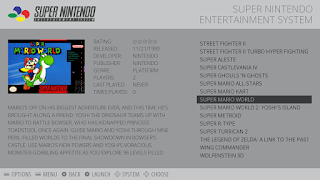
The issue I initially faced with it was that RetroPie expects you to use a controller with a button layout similar to that of the Super Nintendo:
I wanted to map the "A B C" buttons of the Sega Genesis to the "X O R2" buttons of my Hori controller, respectively. Instead, because every console controller in RetroPie is built around the SNES controller, the "A B C" buttons were mapped to the "Y B A" buttons, which consequently were the "Square X O" buttons on my Hori. This was a messy problem, and although I doubt many of you will have to face it, I'm putting my solution out there just in case anyone needs it. I don't think it's 100% perfect, but it's the only one that worked for me which didn't involve much tinkering.
First, select a game for the console you want to configure (in my case, it was Sega Genesis). When the game starts, press Select + X (referring to the SNES -type RetroPie controller configuration) to open RetroArch menu. You will then want to go to Settings -> Input -> Input User 1 Binds -> User 1 Bind All:
This will pop-up a dialog box that will give you 4 seconds to map every button available for this console. This is different than the RetroPie controller config you must be used to right now. In RetroArch, when it writes button "A", for example, it's "A" on the controller of the console you're currently emulating, as opposed to the location of "A" on a Super Nintendo pad. It is therefore entirely possible you'll match a different number of buttons than those found on a Super Nintendo pad.
One thing to note is that this will map these buttons only for when your controller is for player 1. If you find that the button mapping does not work anymore when your controller is plugged into another player port, you might need to configure all of the player ports for that controller. Once that is done, go back to the main menu and save your new config:
A small message in yellow (pictured above) will appear in the lower left of your screen, telling your new config has been saved at ~/.config/retroarch/config/<config name>.cfg. In my case, the emulator name was "picodrive_libretro", so my config file was picodrive_libretro.cfg.
The final step is to tell your RetroPie emulator to use this config when you use this system. Do cd ~/.config/retroarch/config/<console>/ and nano retroarch.cfg. You will have to change the last line to "#include ~/.config/retroarch/config/<config name>.cfg"
Press Ctrl-X to save and exit the text editor, and we're done. Phew!


